Alternative Relaxation Positions
Supine

In this section we are looking at how we can modify the full Savasana supine position, so that we have some alternative options to accommodate either our comfort or perhaps shortage of floor space.
[A]
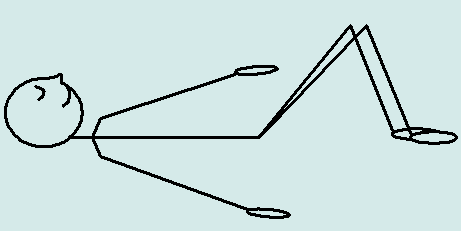
Position [A] is a modification of the traditional Savasana pose and is excellent for relieving discomfort in the lower back.
All details are as for Savasana, except that the legs are bent with the knees directed towards the ceiling. Feet should be firmly in contact with the floor, hip width apart, and parallel. Ideally, the knees are kept hip width apart as well, but this can sometimes be difficult to maintain. If so, you can try turning the toes inwards and the heels out so that the big toes are just touching and see if this gives you more stability in the legs; or alternatively allow the knees to drop inwards to contact each other for support.
This is a useful posture if you just want to take a 5-10 minute break to get yourself back into physical and mental balance.
Please refer to Using cushions to make sure you have full comfort.
[B]
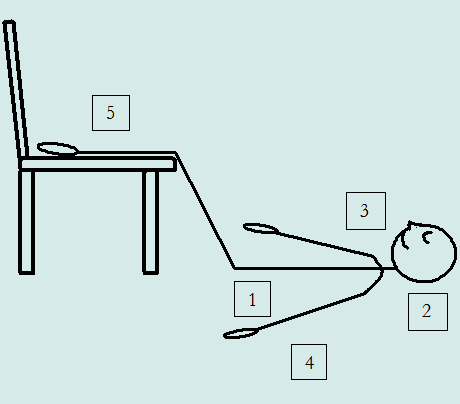
Position [B] can be used when you don’t have enough space to stretch out full length on the floor, or if your lower back needs more help to get comfortable, especially if you have a hollow back. Having the legs and feet elevated is of great benefit too; it will relieve tiredness in the legs, improve circulation, and allow the heart to do its work with less effort.
Start by lying on the floor and getting your feet and lower legs to rest on the chair seat. Bring your buttocks in as close to the chair as you can, so that the thighs are almost upright. Ensure that your buttocks and sacrum are fully in contact with the floor and not ‘hanging’ in the air.
1. The spinal column needs to be elongated to eliminate compression between the vertebrae. Do this by first wriggling the shoulders away from the ears, then wriggling the hips/pelvic girdle away from the shoulders. Re-check that you are still in a straight line and that shoulders are level and hips are even.
2. Rest the back of the head on the floor with the head and neck in a straight line with the rest of the spine. The back of the neck should be lengthened so that the chin is drawn slightly in and down towards the sternum (breastbone). Imagine that your chin and forehead are level and that both are parallel to the floor.
3. Shoulders are even and drawn down away from the ears. Roll the shoulders back towards the floor, so that the front of the upper chest is broadened across the collarbones. Ease the arms away from the shoulders and position them a little way from the sides of the body to create a good space under the armpits.
4. Arms are gently rolled outwards from the shoulder sockets with the elbow joints relaxed and easy. Hands rest on the floor with the palms facing upwards; fingers and thumbs are softly curled.
5. Have the knees and feet at least hip width apart and allow the thighs, knees, and feet to roll outwards so that you can let go of all effort involved with keeping the knees and toes upright.
Close your eyes and you have successfully prepared the way for deep relaxation.
Extra Comfort
Feel free to place a cushion under the calf muscles or feet to maximise your comfort.
A cushion may be required under the head to align and relax the neck, as described in Using Cushions.

